There are a few different scenarios that may cause a customer to want to update existing pipelines or promote pipelines in Control Hub. This document aims to cover all the bases in these various scenarios in terms of best practices around updating pipelines between different physical Control Hub instances and also promoting pipelines within the same Control hub instance. Please find the section that pertains to the situation you are currently facing as different cases have different best practices.
Table of Contents:
- I. Single instance of Control Hub
- II. Multiple instances of Control Hub (or from org to org within same Control Hub instance)
- III. Migrating from existing Data Collectors to Control Hub
- IV. Register new Data Collector containing existing pipelines to Control Hub
- I. Single instance of Control Hub
- II. Multiple instances of Control Hub (or from org to org within same Control Hub instance)
- III. Migrating from existing Data Collectors to Control Hub
- IV. Register new Data Collector containing existing pipelines to Control Hub
Using the GUI:
I. Single instance of Control Hub
This section is intended for customers that purchased Control Hub and wish to promote pipelines from development to production within the same organization in their Control hub instance. If you would like to update pipelines from one organization to another within the same Control Hub instance, follow the directions in the section “Multiple instances of Control Hub” as those instructions are the same.
Instead of necessarily promoting pipelines themselves to production, the pipeline would be in development and when the pipeline has reached the desired state of functionality, the user would create a job on that particular version of the pipeline. This job can then be labeled with PROD or any other appropriate label to distinguish it from the development jobs running in the same organization.
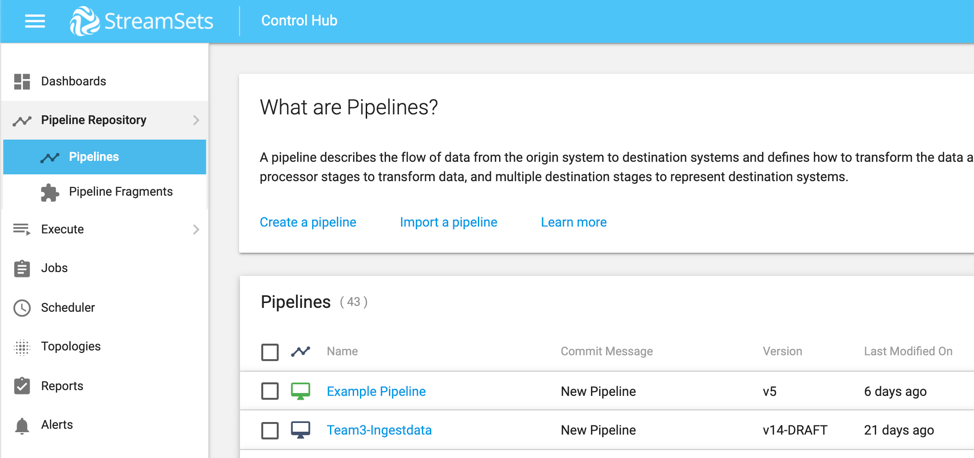
Below you can see a pipeline called “Example - Pipeline”:

This pipeline is being used by two jobs:

One job is for development and testing and one is for actual production. You can also see that both jobs are currently using the first version of the pipeline. Let’s say a developer continues to alter the underlying “Example - Pipeline” but they do not want the production job to switch to that pipeline. Control Hub will not automatically update the pipeline version that the job is using and will continue to use the version of the pipeline previously specified by the user upon creation. The user gets notified that there have been updates to the underlying pipeline and that a new version is available by a red icon next to the job name like the example below:

From here, the user can choose to do a few things. The user can ignore the splat and wait for a verified version of the pipeline before accepting the update, or the user can accept the updated pipeline so that the job can run on the most recent version. In this case, I want to update my dev job but not my production job so I click on the red icon and I am prompted with this:

Click ‘update’ and you should now see this:

‘Example - Job - Dev’ is now using v2 of the ‘Example - Pipeline’ but ‘Example - Job - Prod’ is still using v1. This is how you can control versioning and pipeline promotion within the same organization on a single Control Hub instance.
Often times, this will be a little bit more gated where the developer must share the pipeline with a QA team and then QA or another team does the official updating of the job to production.
II. Multiple instances of Control Hub (or from org to org within same Control Hub instance)
This section is intended for customers that purchased Control Hub and have installed two or more separate instances of Control hub in order to silo development and production environments completely usually due to strict company security standards requiring a gated process to promote jobs into production. This section also addresses the similar process of updating pipelines from within the same Control Hub instance between different organizations.
If there are pipelines from the dev instance of Control Hub which are now ready to be migrated or updated over to the production Control Hub, you would do so by exporting the pipelines from dev Control Hub and importing them into prod Control Hub. Naturally, dev and prod do not have to be the only environments that are at play or that are installed but for the sake of these examples, they are the easiest to understand.
To move pipelines and jobs from one instance of Control Hub to another or to move from one organization to another follow the steps outlined below.
Select the pipeline you want to export from that organization or that instance of Control hub:

Notice the red circle I have placed over the export button. Click this button to export a zipped file of one or more pipelines that you wish to migrate. Again this can be from org to org or Control Hub to Control Hub instance. Now that you have your exported pipelines go to the org or Control Hub instance that you wish to migrate these pipelines over to. Make sure to choose import from archives when working with zip files and import pipeline when working with JSON files.
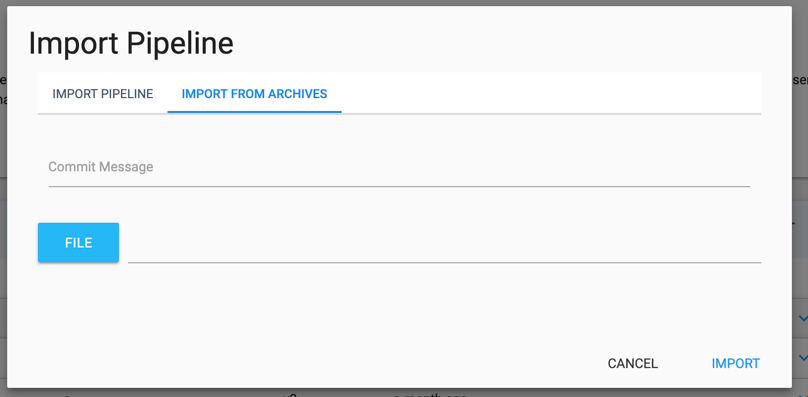
If the pipelines already exist there, the import will update those pipelines therefore maintaining version control. If the pipelines do not exist yet in that org or Control Hub, they will be created however the previous versions of that pipeline will not be available and what is imported will be seen as the first version available. See below
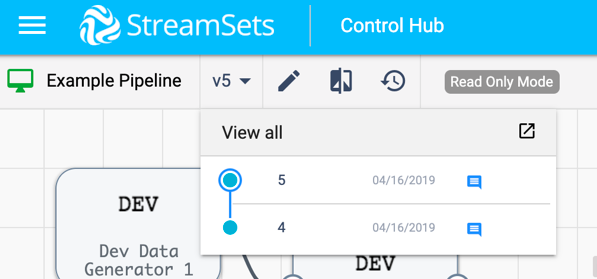
Notice how the only versions of the pipeline the user can see in this org in this Control Hub instance are 4 and 5. That means when the user imported this pipeline from another Control Hub, it was already at version 4 (which is now the first available version you see here).
With these steps you can export and import back and forth between not only organizations but also between different instances of Control hub
III. Migrating from existing Data Collectors to Control Hub
Part 1:
This section is intended for customers that purchased Control Hub after already having Data Collectors running in development and sometimes production in standalone mode.
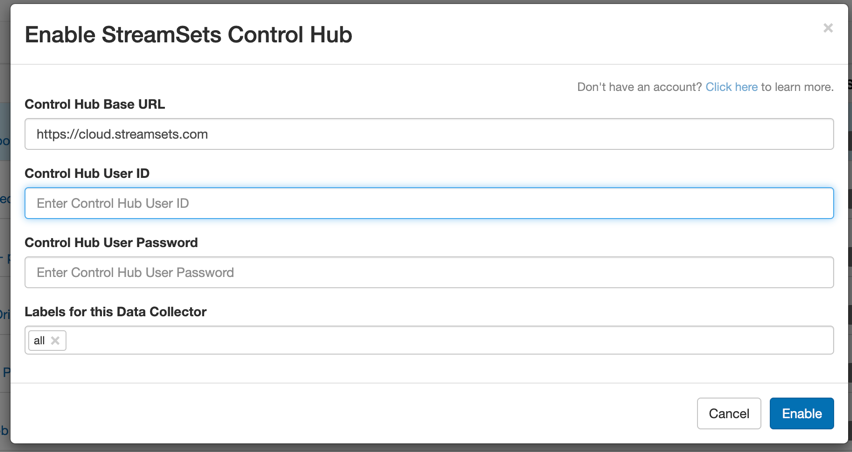
Now that you have tried and used Data Collectors in development or even production, it’s time to move to Control Hub. This is made easy and can be done in a few ways. One way is by registering your existing Data Collector to Control Hub.
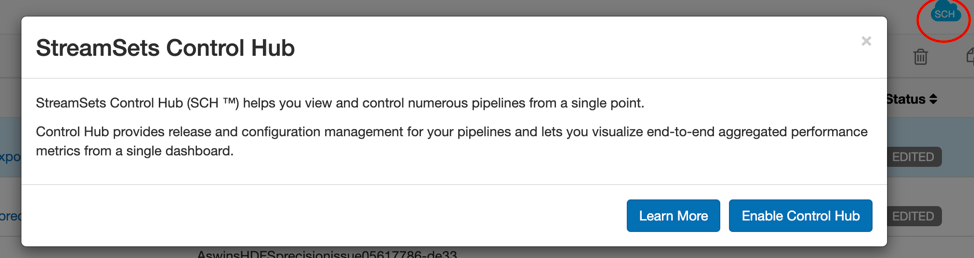
To register a Data Collector with Control Hub, there are two ways to do it. The picture above shows you how to accomplish this via the Data Collector UI. Click on the “Control Hub” cloud button in your Data Collector UI (shown in the picture by the red circle). A window will then open up and the user simply needs to follow the prompts to enable Control Hub.
Once you do this, you can then select all your pipelines from the pipeline list Data Collector home page and click ‘publish to Control Hub’ as shown below.

Select all your pipelines and click the cloud with the up arrow (shown in the red circle). You can verify that the Data Collector is registered by the blue cloud with the checkmark on the left side. To verify that your pipelines were published to Control Hub, go to your Control Hub instance under the pipeline repository tab on the left-hand side and you should see your pipelines there.
If the pipelines already existed there (perhaps you published them before but made some more changes from the Data Collector UI), the existing pipelines will be updated. This ensures that no versions are lost or clobbered over when publishing from a registered Data Collector. If the pipelines did not exist already in that Control Hub, they will be created. Data Collectors do not have pipeline versioning so previous versions of the pipeline that had existed on a standalone Data Collector will not be visible from Control Hub’s pipeline store as they were not previously being recorded. This is the benefit of using Control Hub and pipeline versioning from this point on. Once you have published the pipelines from a registered Data Collector, you can edit these pipelines from Control Hub or that Data Collector (and publish when ready).
***
Before you read this section, this is not a recommended way of migrating pipelines.
Part 2 :
Another way to accomplish this would be to ‘Export pipeline for Control Hub’ from the Data Collector UI. You might do this if you do not wish to keep the Data Collector or are planning on migrating the work onto your new Control Hub with new Data Collectors.

When you do this you get a zip file with the pipelines you have chosen to export (zip file as usual with exporting any objects for Control Hub). There are some very important things to note here that we will cover.
Pipelines were meant to be promoted/migrated from this list of the following ways:
- Organization to Organization within the same Control Hub
- From Control Hub instance to separate Control Hub instance directly
- From Data Collector that is being registered with that Control Hub instance by publishing
Pipelines were not meant to be promoted/migrated from standalone Data Collectors (that are intended to remain standalone and never be registered) to Control Hub. That doesn’t mean it’s not doable, however.
If you take that zip file and directly import it into Control Hub, you will need to remember to edit these pipelines only in Control Hub and not via the standalone Data Collector again. The reason for this is because the next time you edit that pipeline from the standalone Data Collector and attempt to export/import into Control Hub, Control Hub will assume it’s a new pipeline and will actually create a duplicate of that pipeline but with your new version. This is not ideal because it is not maintaining versioning for the same pipeline and instead of creating a new pipeline perversion.
If the team for some reason must work with standalone Data Collectors (which again means they are not registered with Control Hub), it is recommended that you install and register what is called a ‘Designer Data Collector’ for that particular instance of Control Hub in order to handle situations these situations. After installing and registering the design Data Collector, follow the steps below:
- Export desired pipelines from standalone Data Collector
- Import pipelines to designer Data Collector which will work to create the pipelines if they do not exist and update the pipelines if they already exist
- From designer Data Collector after import, select all new/updated pipelines you want to publish to Control Hub
- Click the publish button (cloud with an up arrow inside)
- Login to Control Hub and verify pipelines have been newly published or updated
To edit these pipelines and move forward with development, the user will need to use the designer Data Collector (and publish) or Control Hub to edit pipelines directly.
IV. Register new Data Collector containing existing pipelines to Control Hub
This section is intended for customers that have already gotten Control Hub up and running with registered Data Collectors and wish to register another Data Collector with existing pipelines. The reason for this might be that the customer has a new team joining the use of Control Hub and that team already has some work done on their existing Data Collectors but now want version control through Control Hub.
If the team does not want to register their Data Collector with Control Hub (perhaps it was a POC Data Collector), follow the steps in section III part 2 to export pipelines as a zip and import directly into Control Hub. This assumes absolutely none of the pipelines have already been imported into this Control Hub previously and this should be seen as a one time migration. After the migration of these pipelines to Control Hub, the designer Data Collector or the Control Hub pipeline editor should be the way users continue to modify these pipelines. Do not attempt to continue to modify pipelines via standalone Data Collectors after you have migrated those pipelines to Control Hub as Control Hub does not maintain versioning for pipelines it is unaware of. If you attempt to do this, you will see duplicate pipelines when not intended. You can choose to directly import into Control Hub or import them into the designer Data Collector which is outlined in section III.
If the team wishes to register their Data Collector with their existing pipeline, follow the instructions outlined in section III part 1. However, in this case, after registering the Data Collector, the users can directly publish the pipelines from that Data Collector to Control Hub allowing for pipeline editing from both that newly registered Data Collector and Control Hub. This will continue to maintain versioning through Control Hub.
Continue this process for each newly onboarded team or Data Collector with pipeline you wish to migrate.
Using the REST API
This section will replicate the steps above using the REST API
In order to use the REST API, these steps need to be taken first to get a Control Hub Session Token. Here is an example of a way this can be accomplished:
Start by getting a Control Hub session token with calls like this (single command):
$ curl -X POST -d '{"userName":"user@org", "password": "password"}' https://cloud.streamsets.com/security/public-rest/v1/authentication/login --header "Content-Type:application/json" --header "X-Requested-By:SDC" -c cookie.txtThe call above writes a file (cookie.txt) to disk. Extract the session token from that file and save it to an environment variable like this:
$ sessionToken=$(cat cookie.txt | grep SSO | rev | grep -o '^\S*' | rev)
Make sure you received a session token by echoing the value to the console:
$ echo "Generated session token : $sessionToken"
We'll pass that session token in an "X-SS-User-Auth-Token" header in all subsequent calls to the Control Hub's REST API. Here is an example of importing a job (single line):
$curl -v -F "file=/Users/StreamSetsUser/Downloads/job.zip" https://trailer.streamsetscloud.com/jobrunner/rest/v1/jobs/importJobs --header "Content-Type:multipart/form-data" --header "X-Requested-By:SDC" --header "X-SS-User-Auth-Token:$sessionToken"I. Single instance of Control Hub
This section will go over how to update a job’s underlying pipeline version when the desired job is no longer up to date. This section will not cover how to update the pipeline itself.
After updating the pipeline, publish the changes to the pipeline store in Control Hub using the following rest call:
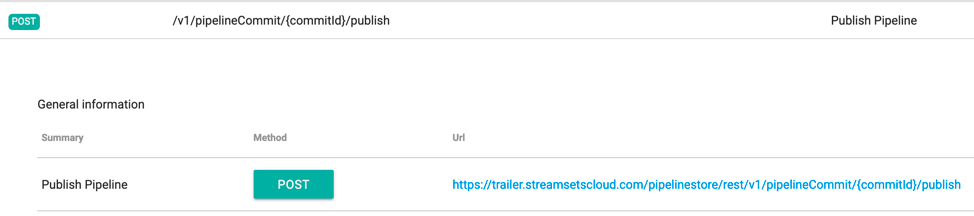
Instead of ‘trailer.streamsets.cloud’, place your Control Hub hostname here. After publishing the pipeline to the pipeline store, refer to section I of the UI portion of this doc for the example of the Example Dev Job and the Example Prod Job. Depending on which job you wish to update with the new version of the pipeline, use the following rest call:

When you do this, the job will be stopped, updated, then restarted automatically for you. Continue this process for updating pipelines in the same Control Hub instance in the same Control Hub Organization.
II. Multiple instances of Control Hub (or from org to org within same Control Hub instance)
This section will cover how to export and import pipelines from different Control Hub instances or between different Organizations within the same Control Hub instance.
The first step is to make sure that the most recent version of the pipelines you wish to migrate have been published:

After publishing them, you will need to export the pipelines:

This will again give you a zip file. Import this zip file into the desired separate Control Hub instance or into another Organization within the same Control Hub:

If the pipelines have never been imported before, it will create a new pipeline starting with the most recent version you are importing. For example, if you exported the pipeline as a v4 into a Control Hub instance where you have never imported the pipeline before, the first version that will show in the new org or Control Hub instance will be v4 (also detailed in the UI section II above). From here, note that the pipelines will be updated or created in the pipeline store, but another step would be necessary to update the job with the new version of the pipeline (section I above) or create a new job for that new pipeline.
III. Migrating from existing Data Collectors to Control Hub
This section is for a user trying to register a Data Collector to a Control Hub instance and then publish the existing pipelines on that Data Collector to Control Hub.
To register a Data Collector to Control Hub via rest call, do the following (one line):
$ curl -X POST -d '{"userName":"admin@MyCompany", "password": "MyPassword"}' https://cloud.streamsets.com/security/public-rest/v1/authentication/login --header "Content-Type:application/json" --header "X-Requested-By:SDC" -c cookie.txtAfter successfully registering the Data Collector, publish the pipelines to Control Hub from the Data Collector using the following commands (both single-line commands, remember to replace hostnames with actual host details for SDC and SCH):
$ curl 'http://<SDC_host>:18630/rest/v1/pipeline/<pipelineId>/export?includeLibraryDefinitions=true'

$ curl 'https://trailer.streamsetscloud.com/pipelinestore/rest/v1/pipelines' -X PUT -H 'Accept: application/json, text/plain, */*' -H 'X-SS-User-Auth-Token: $sessionToken' -H 'X-Requested-By: Data Collector’
The first command will export the pipeline from the Data Collector (in this case this is NOT a standalone Data Collector, it is registered). The second command commits the pipeline instead of importing the pipeline. This is very important. If you attempt to import the pipeline, it will create a duplicate pipeline thinking that it is a new pipeline commit. Instead, when doing it this way, you must commit the pipeline in order for the existing version to be updated with the changes for the same pipeline. Refer to section III part 2 in the UI portion of this doc.
IV. Register new Data Collector containing existing pipelines to Control Hub
Collectors registered, but now want to register another Data Collector which has existing pipelines on it and publish those pipelines to Control Hub.
The first step is to follow the directions for registering a Data Collector via the rest api outlined in section III above. The next step is to publish the pipelines that exit on that Data Collector to Control Hub (which is also outlined for the rest api in section III).
It is important to keep in mind that the pipelines that were just published form the newly registered Data Collector do not exist on any of the other Data Collectors that are registered with the same Control hub. To edit these pipelines, you can do so via that Data Collector where they came from/were published from or you can edit and update those pipelines via Control Hub directly (recommended approach). If you choose to continue to edit the pipelines in that Data Collector, you will need to remember to publish the versions/drafts to Control Hub since no editing that is done from the Data Collector can be seen by Control Hub until it is published.
Closing Notes:
It is always good practice to edit pipelines via Control Hub and only Control Hub after they have been published or imported. Data Collectors, as we have mentioned, do not track changes that have been made to pipelines and to ensure version control a user must check these changes into Control Hub’s pipeline repository.
If you are not getting the results you wish to see from the export/import/publish process, please review the document and make sure that developers are following expected procedures. If anything in this document is not clear, reach out the Customer Success Engineer and ask them to help guide your team towards best practices.
Recap:
-
Good practices
- Export from one SCH, import directly to another SCH
- Export from one Organization in an SCH, import directly into another Org in same SCH
- Register Data Collector to SCH, publish pipelines directly to SCH
-
Bad practices
- Exporting changes to pipelines from standalone Data Collectors to SCH
- Attempting to update existing pipelines in SCH from exports of pipelines that came from standalone Data Collectors (results in duplicate pipelines, does not update the current version by design)